Tuesday, July 27, 2010

Whoopie pies....joining the bandwagon.


Those of you who follow food blogs will know that there are lots of trends in the food blogging community, not unlike clothing fashion. While yesterdays raging trend was cupcakes in all colors and flavors, the new trend is now whoopie pies. Wow. You have to try them to believe me.We called them devil dogs when I was little, but these whoopie pies are on a whole new level. It seems to me that the difference with whoopie pies is you can mix and match any flavors. There is a new book out called "Whoopie Pies" and in it there are fifty recipes for the cake part and fifty recipes for the filling. Double wow. I have a copy on hold at the library and I can't wait to get my hands on it to try out all the cool combinations that are inside. In the meantime, Bakerella posted peanut butter whoopie pies. They are delicious, and I dare you to stop after one. Without any further ado, I present to you..... 
Whoopie Pies!
Whoopie Pie Cakes
1/2 cup shortening
1 cup white sugar
1 egg
2  cups all-purpose flour
2/3 cup unsweetened cocoa powder
1 teaspoon baking powder
1/2 teaspoon salt
1 teaspoon baking soda
1 cup milk
1 teaspoon vanilla extract

Preheat oven to 350 degrees F (180 degrees C). Grease cookie sheets. In a large bowl cream shortening , sugar and egg.
In a separate bowl sift together  flour, cocoa, baking powder, salt, and baking soda. Add to other mixture alternately with milk, beating well. Add vanilla at the end.
Drop by large spoonful on greased pan. For even sized cookies, use a melon scoop. Bake for 10-15 minutes. Remove to wire rack and cool completely.

Peanut Butter Filling
3/4 cup creamy peanut butter (or crunchy)
3/4 cup unsalted butter or margarine
1 1/2 cup confectioners sugar
1/2 teaspoon salt
Beat peanut butter and butter on low until creamy using a mixer.
Add sugar and salt and beat on low to incorporate. Increase speed to medium and beat for about four minutes until the filling is light and fluffy.
Spread filling on flat side on one cooled cake. Top it with a second cake and press gently. Store whoopie pies in an airtight container.

Tuesday, July 20, 2010

Something yummy....cheese blintzes


Mmmmmm....mix some farmers cheese with some vanilla and sugar, and the result is heavenly. Delicious. Mouthwatering. Scrumptious. (Can you tell I'm hungry?) Some of you might recognize these as crepes, but growing up they were called blintzes. Sure, you can pick up a pack of Golden's Blintzes from the store, but you just can't compare the freshness and the taste to a fresh, homemade blintze. Some people get scared away by the many steps of making  blintzes, but it's really very simple. The technique for making the blintze skin may take a few tries, but once you get it right, its very easy. And if you have already made egg rolls, the rolling is the same technique. So lets get started, shall we?                                        


Blintze Skin Batter
3 eggs
2/3 cup water
1/2 cup milk ( soy, for non dairy)
1/2 teaspoon salt
1 cup flour
Beat eggs and add rest of batter ingredients slowly. Mix with a wire whisk to eliminate lumps. Heat a large frying pan over medium heat. Spray a 1 second spray of Pam. Have a clean dinner plate ready next to you so that you can flip the skin into it. Using a ladle, pour about 3 tablespoons of batter into the hot frying pan. Lift the pan off the fire and tilt the pan in all directions so that the batter spreads all over the bottom of the pan. Put back on fire until the top of the skin looks dry to touch, and not sticky.

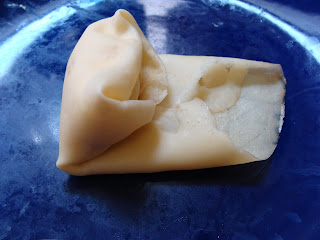
If the edges start to crisp, the fire is too high. Flip the skin over onto the dinner plate. You may need to loosen the edges with a spoon until it flops out. Spread onto the plate, respray the pan with Pam and pour the batter for the next blintze into the pan. While the next skin is frying, spoon a heaping tablespoon of filling (recipes to follow) in the bottom center of the skin like this:
Fold the bottom strip of skin over the filling:
 Then the left side:
And the right:
Then roll up....
Until you've got this:
A few points:
  • Try to roll it as tightly as possible without breaking the skin.
  • Each time you pour the batter into the pan, stir the batter a bit as the flour tends to settle to the bottom. 
  • If the batter is too thick, and doesn't spread easily in the pan, add some water- 1 tablespoon at a time. If the skin is translucent, it was too much water, and you need to add some flour.
Now for some yummy filling recipes:
Cheese Filling
1 pound farmers cheese
2 egg yolks
2 tablespoons sugar
1 tablespoon vanilla sugar, or 1 teaspoon vanilla

Mix everything together.

Potato Cheese Filling
8 medium potatoes
1/2 cup cottage cheese
1 large onion
1/4 cup oil

Peel and boil potatoes. While they are cooking, saute the onion in oil. Drain and mash the potatoes. Add the sauteed onions and cottage cheese. Salt to taste.

Each filling recipe makes enough for one recipe of batter, about 15 blintzes. Raw blintzes freeze very well so you can make a lot and and take them out as needed. When you are ready to serve them, fry them in about an inch of oil, 3-4 minutes on each side. Or you can bake them at 375 for about 15 minutes, until they are crispy.  Blintzes can be enjoyed anytime- for breakfast or a snack. Pair them with a light salad and soup, and you got yourself a delicious dinner.

Tuesday, July 13, 2010

If at first you dont succeed....

Ummm yeah. So these are for real. It happens to me too....disasters.  Cookiesandcups makes the most adorable treats ever, and I have had lots of success with her creations. So when I saw these  ice cream cone cupcakes, I was just waiting for the right opportunity to come up to make them. When I was invited to a girls sleepover camp to give a baking class, I had the perfect opportunity to show off. Ok, so that should have been the first indicator that everything is not going to go smoothly-showing off never leads to anything good :) Moving along, I decided to be a smart alec and not use the chocolate cake recipe provided, and to use my no fail, perfect chocolate cake recipe. ( it is perfect, really!) Well, you can see what happened to that idea above....24 ice cream cones, and an oven filled with smokey chocolate batter, I was about ready to give up and just admit that I can't make everything. But I have this really cool thing in my house this summer- my two little sisters are staying by me....and little sis's always believe in their big sis's. So my little sister (yep, the chocolate bear claw culprit) turned to me and said " you cant just give up!" How are you supposed to argue with that? So I went to sleep. Morning came and with brand new resolve and energy, we got everything going.  24 overflowing cones, 2 frosting recipes and one smashed ice cream cone later, I hereby present to you: 


 See- I wasn't kidding...

Notes:
  • Use the recipe that Martha gave for the cake- trust me!And don't fill the cones more than half way. Seriously.
  • For the cream, I used this recipe, and was very happy with the flavor. I did substitute the butter with margarine and it came out fine. The Liebers vanilla sugar gives it a terrific vanilla flavor.
  • The cherry is a cherry sour candy. 
  • Refrigerate the swirled ice cream cones for 2 hours before dipping
  • One more very important thing- these babies are TOP HEAVY. If you put one down, and breathe next to it, it will fall. Don't believe me? Reference above picture. Since Cookiesandcups so kindly warned me, I cut a square of cardboard the exact same size of the box they were going in, and then cut twelve circles in the middle of the cardboard- exactly the same circumference of the bottom of the cones so they can slide in and hold them in place. As an extra security I wrapped the bottom of the cones with foil so they wouldn't wiggle, and they survived a 3 hour car ride with 3 adults and 3 monkeys in perfect condition. Not a sprinkle moved out of place.

Tuesday, July 6, 2010

Pancakes!

Call me the perfect mother if you must, but we love going to the library. (We being: My three monkeys and I) One of the best parts of going to the library is getting books on tapes, and having my monkeys transformed into angels as they sit entranced listening to their books on tapes. One of the books on tape that we got last week was "Curious George makes Pancakes." My kids listened to it over and over again, until my 3 year old was able to repeat the book word for word verbatim. So when my mother in law gave us some blueberries, we were definitely in the right frame of mind for blueberry pancakes! Here is my favorite ( and only!) recipe for pancakes. I love it so much, I haven't ever made pancakes from a mix! 

Perfect Pancakes
2 cups flour
4 teaspoons baking powder
1/2 teaspoon salt
1/2 cup sugar
Mix above ingredients and add:
2 eggs
2 cups milk ( can use soy milk)

Heat oil in skillet, fill ladle with batter and pour into hot pan. Fry until the pancake starts to bubble and flip. Enjoy!

The irony of course is that my 3 year old monkey refused to touch the pancakes, because there were "ewwy blueberries inside". Apparently Curious George he is not. But we love him just the same, and every crumb of the pancakes were finished. 

Related Posts Plugin for WordPress, Blogger...