Ok kids, put away your flour and eggs and settle down. Its story time!
Many moons ago, the CantStopBaking family lived over the sea and through the desert in a far away land. After five moons, or perhaps I should say suns, we made the journey over the ocean, and into the lovely Garden State otherwise known as New Jersey. After this long and arduous trek, ahem *flight*, we kinda had no furniture. Zilch. Zero. Nada. With two and a half monkeys, furnishing our empty house immediately was a top priority. Of course I had grandiose plans of glossy cherry wood furniture and sumptuous leather couches, but sadly that wasn't a reality. (Did you know the New Jersey state motto is "Keeping it Real"? Ha!)
Lucky for us, there was a brilliant website, that was quite a novelty back then called Craigslist. (That was in sparkly letters by the way. If computer screens could sparkle, those letters would be sparkling.) So I scoured Craigslist- and by that I mean obsessively hit the refresh button every 3 minutes on the furniture for sale section- for functional yet classy furniture. We were able to piece everything together, and I am quite proud of what we have. One of our best finds was our dining room set. I hit jackpot on that one- a woman was trying to empty her parents house after they passed away, and she was selling it for next to nothing. I sped over there to check it out, and it really was quite nice. Beautiful solid walnut wood, with no scratches and in excellent condition. Except the chairs- they were hideous. White with Pepto Bismol and mold colored flowers, and cane backs- not quite the gleaming cherry wood set I had dreamed of. But being the optimist that I am, I figured- lets just take them, and we'll figure something out later. Well, later turned out to be just around the time that our monkeys figured out that cane backs are the perfect size to stick little fingers in. And if you wiggle them around enough, the hole gets bigger. Quite fun actually. You should try it one day. It was then that I realized that later is not quite so much later as much as it is right now. Those of you who have been following my ramblings for the past few years, know that I am nothing if not crazy. So I would never just get the chairs reupholstered like any sane person. Totally not my cuppa' tea. It was around this time that the next brilliant website was born. Pinterest. (Those were sparkly letters too, by the way.) Sheer brilliance. And a gold mine of reupholstering ideas. I had this reupholstering idea simmering in my head for about a year, with Pinterest fanning the flames, but I still couldn't get the guts to do anything about it. It's a big and scary job.Well, as the chairs turned from white, to beige, to tan to blech, I realized, the time is NOW. I might have even used those exact words when I informed Big D. of the next big project to take place in the CSB household. (To which he of course sighed the sigh of the weary, and said "Ok, how much is this costing us." To which I replied, "practically nothing." The response to that was *snort*. Men...) Anyhow, I got serious in my research and I just DID IT. I was really happy with how they turned out- there are lots of blogs on how to reupholster chairs- not so many on how to convert cane backs to fabric backs. So, I'd like to donate my lovely knowledge to the wonderful world wide web, and here is my attempt to put together a tutorial for any other person who is trying to figure out the same thing. Or for your entertainment. Either one is cool.
*Disclaimer:
I did not do this project with a newborn baby. This was tackled last April, and I have been waiting for the perfect opportunity to bequeath my knowledge to you. Which is today.
*Disclaimer after disclaimer:
This is my first time making a tutorial like this, so please bear with me. Please excuse the switching back and forth from first person to directions. If its not clear, please email me with questions- Cantstopbaking{at}gmail{dot}com. Also, I am in no way shape or form a professional upholsterer. (Ha!) This is a project that I figured out as I went along. If you are not up for some trial and error, it may be better to use a professional upholsterer. IF you are up for an adventure, have some extra time on your hands (each chair took 3+hours to do) and would like to do some budget friendly redecorating, read on:
Here we go....
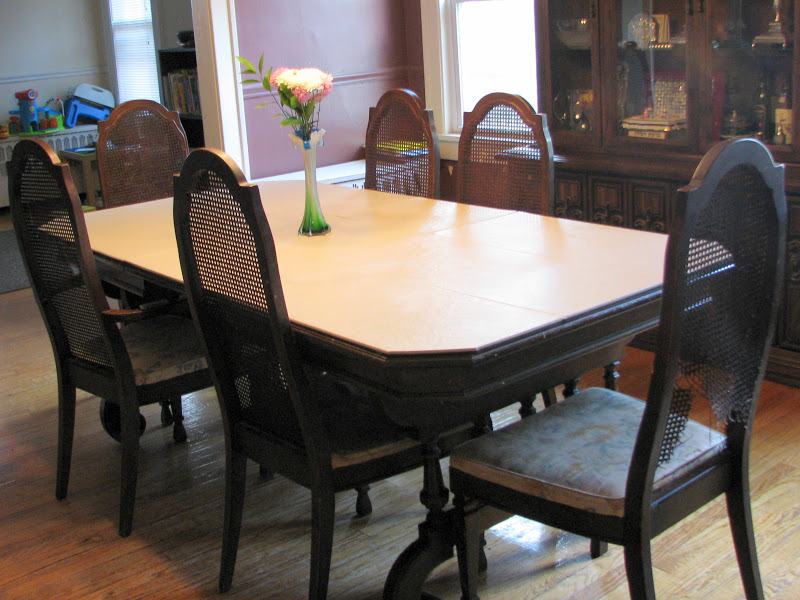
1. Here is the requisite before picture. Note the cane backs, dirty fabric and ripped chair at the end.
2. Before I did anything to the chairs, I went on a huge shopping spree at a local fabric warehouse in Belleville, NJ. I was really lucky and scored beautiful fabric for $3 per yard! I used this chart for measurements.
In the end I only used about half the fabric I bought, but since it's a closeout warehouse, I did not want to risk running out of fabric, and not being able to find it again. Here is the list of supplies that I used:
-12 yards of upholstery fabric (this is how much I purchased, not how much I used.)
-12 yards plastic (with 4 monkeys, plastic covered chairs is a given.)
-thick foam padding to replace the chair cushion
-thin foam padding for the filling of the chair back
-upholstery batting
-heavy duty upholstery webbing
-upholstery trim
-sharp fabric scissors
-electric staple gun (a must- I started with a manual, and my hand was falling off after a few staples.)
- at least 2 boxes replacement staples- its better to buy extra- its a huge pain to run out to Home Depot mid-chair
-glue gun
- approximately 8 replacement glue sticks
- electric drill/screw driver- made taking apart the cushions much easier.
-sharp razor
I was able to buy everything at the fabric warehouse (except for the staple gun and glue gun) and the women there were very helpful in terms of measuring the fabrics. Total cost of all supplies was about $230. Not bad for recovering six chairs-and I can even make a matching tablecloth with the leftover fabric....

3. First step is to flip the chair over so you are looking at the underside of the seat cushion. You should be able to see a screw in each corner. Unscrew each screw, and the cushion should slide right off. (Save the screws for when you are done. If the screws are old, you may need to replace them.) If it's a really old cushion, it can be very crumbly and messy. Cut off all the old fabric and padding ( if the padding is in good condition, keep it for the chair!) Our chairs were very old, so I was not able to use the fabric as a pattern for the new upholstery. Most tutorials recommend keeping the fabric as a guide when cutting out the new fabric, so if you can salvage the shape, keep that too. As you can see in the above picture, the cane back had to go, so I got to work with a razor blade, and just cut the cane right off. You should end up with a basic frame by the time you are done. ( top right corner picture.)

4. To make a pattern for the replacement fabric for the back of the chair, I taped together 6 pieces of printer paper (resourceful, I know) and I held it up against the chair back to trace the shape. This way when I was cutting out fabric, I had an idea of the measurements. I would recommend leaving at least 3-4 inches on each side of the fabric for trimming and stapling. Ok, now you can start cutting. You need two pieces of fabric for each chair back- one for the back and one for the front. Cut out two pieces of plastic for each chair, the same size as the fabric, if you are planning on covering the chairs with plastic too.

5. All work was done with the chair facing me. To start, staple the plastic to the frame of the chair. If your chair has a border in the wood, make sure you are staying inside the border. The plastic layer is one of the easiest layers because its see thru- it gets more difficult when you staple the fabric, because you cannot see where the staple is landing. Just go slowly, and fold over the fabric to check that you are in the right place. Also, make sure the staple is in the wood- not in the empty space in the middle of the chair back. If the staple hit the wrong place, use a flat headed screwdriver to pull it out, and try again. After the plastic is in place, start stapling the fabric. Remember: This is the back layer of fabric, so you need to staple the fabric backwards- with the pattern facing the back of the chair. This way it will be what you see when you are looking at the back of the chair. It is very important that the plastic and fabric are pulled very tight. I learned from my research online, that you should start stapling at the top of the chair frame, and then work your way down. I started at the top, did a little on one side, a little on the other side, working back and forth until I got to the bottom. Make sure to pull the fabric tight each time you staple, so that it will lay flat.

6. After the back layer of fabric and plastic are in place, its time to get the back support in. The main component of the back support is the burlap webbing. I'm not sure how much I used- I measured it right before I went to the store. As you can see in the picture before the above, I used two strips vertically, and three strips horizontally. The support is fine, but when the chair is in the sunlight, you can see the outline of the webbing. If I would do it again, I would probably use three strips vertically, and four or five horizontally, so the back is entirely filled in. The webbing is the hardest part to staple- its very thick. Hang in there though, it should work. After the webbing, comes the padding. This is pretty straightforward. Cut out the shape of the back, and glue gun it to the webbing. The batting goes on top of the padding, and you can glue gun that on too- it doesn't need to be stapled. Now you are up to the last two layers- the fabric, and the top layer of plastic. It is very similar to stapling on the back layer- just make sure its nice and tight. Check each staple to make sure it didn't pop through the middle, and that it went into the wood. You are stapling through a lot of layers here, so you are going to need to use some muscle.

7. Once all the layers are stapled in place, its time to clean up your work! Trim all the layers (as pictured above) to about a half an inch to an inch past the staples. Fold over the raw edges, and staple them down so that they are facing the inside of the cushion (pictured below.) This is what you need the trim for- to cover the raw edges. When you are purchasing trim, make sure you buy a trim that is wide enough to cover the "hem" and the staples. If you can't find a wide enough trim, you made need to use two layers of trim. ( I did not purchase the trim until the chairs were done,so that I could see how wide it would need to be.)

8. Apparently I neglected to take a picture of the adding the trip step, but its pretty simple. Heat up the glue gun until its very hot. Slowly glue gun the trim right on top of the staples and the raw edges. Start at the bottom of the frame, and work your way around the chair until you reach the other end. This step needs to be done before you reattach the cushions- the cushion will cover the raw end of the trim so that no little fingers can pull it off. Be careful not to melt the plastic covering with the tip of the glue gun!
9. PHEW, the hardest part is over....now onto the chair cushion. Although the most complicated part of the chair is the back, I found the cushion very challenging. Pictured above is the board that the cushion is made out of. Basically, just trace the board onto the thick padding, and cut with a razor.
10. To measure the batting, fabric and plastic, I used the board again. Leave at least 4 inches on each side so that you have enough fabric to fold over the sides. Fold the plastic, fabric and batting over each side and staple into place. Remember- the fabric here needs to be super tight so the cushions have a nice smooth surface. I started with one side, did the side across from it, then I did the side at either end. I found the easiest way to staple the cushions was to put the cushion on another chair, kneel on top of the cushion and then staple away. That way when you get up from the cushion, the padding fills back up and smooths out the cushion.

11. Now here is the part I found challenging with the cushion- the corners. The corner above is pretty neat, but it was hard to figure out how to fold the corners so that they aren't bulky- trial and error is the way to go here. Remember- if it's sloppy, you can pull out the staples and start again. You really need to use muscle here to get through all the layers-those corners are very thick. My knight in shining armor came very much in handy here...
12.Once the cushioned is all stapled, you can flip it back over onto the chair frame. Flip the whole chair over, and screw each corner back into place. Big D. was definitely needed here to screw the cushions in- I had to hold them in place, and he screwed in each corner. Make sure the cushion is lined up properly with the frame, and that no raw edges of staples or fabric are sticking out.
And here is the final product. Ta da! Amazing before and after, no? So here we are, about nine months later, and the chairs are still doing great! I basically banned scissors from our house, but other than that, they are wearing very well.
I hope this was clear and easy to follow. Please remember, I'm happy to receive any emails with questions you may have.
Next week we'll go back to the kitchen for some yummy food....Have a great week!
.jpg)